


Top right in the blue header you can find a tiny icon with two people. Most users probably ignored it in the past, which – maybe – was not a sin. But this should change now, as we brushed up the personal area in many ways. It is now a helpful tool for your work in Designer.
We still have changes in mind which will make the personal area even more visible and faster to use. But it will take some time until we are through with these changes. In the meantime we will test the personal area in practical work by ourselves. Of course the feedback of our customers is also highly welcome.
3 tabs and lot of configuration options
The personal area can have up to three tabs. It depends on your configuration whether you see just two or all three of them, their sorting order, the icons to be displayed and other functionalities. Of course the configuration settings are valid for all users of the same Designer installation.
You can find all technical details in the user guide and in the release letter belonging to the delivery version including the new personal area. This post looks at the personal area from the user’s point of view.
History
Sometimes you just want to get back to work at the point where you stopped the day before or before your break with logout. Here you can use the history showing all recently used elements. You surely know this from other applications.
In Designer templates, segments, rules and conditions will be listed if the current user – and here configuration possibilities start – recently just opened them or changed and saved them.
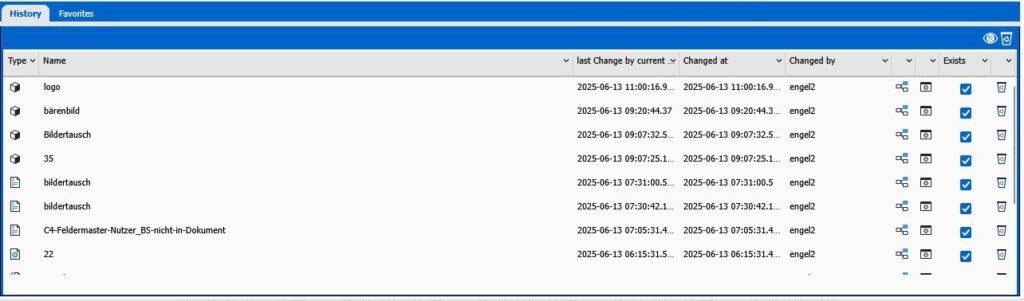
As you probably know from other screens in Designer, you can sort the columns ascending and descending and change their width. As several users may have worked with the same element, there are two columns with a “changed” date. If they have the same content, only one person worked with the element. If they differ, you will probably find the name of another user in the next column.
You can open the elements from this tab to continue work or you can click on the tree icon to highlight their position in the document tree.
It is of course possible that an element which is part of you list, is deleted. You will recognize this by a suffix behind the name (DELETED) and in the column with the blue checkboxes. If you try to open such an element you will see a message offering to delete the so-called relic from the list with one click. You also have the possibility to hide all relicts in the list by clicking on the icon with the eye top right above the list.
It is of course not only possible to delete relics, but also every single element in the list or the entire list in the blue header line.
Favorites
Some elements are needed repeatedly. Maybe you know their place in the document tree by heart, but in large trees with nested structures it is much easier and quicker to click on a favorite in your personal area.

Every favorite is a blue bar which can be opened by a click on the arrow top right. If the element has a description it will become visible.
Lots of small icons are visible in the header line of the single favorites and in the entire area. As you can select documents, segments, rules and conditions as favorites a quick view on the first icon shows you the type of element and opens it with one click.
The other well-known icons allow you to open the properties screen, to delete the element or to highlight it in the document tree.
There is something special about favorites – the delete warnings. Shall the user, who deletes an element, shall see a warning if he himself or somebody else has saved this element as a favorite? If so, the owner of the favorite has to select the checkbox in the element or select this protection for all favorites. The user who wanted to delete the element has to decide whether he skips deletion or whether he wants to delete the element and the entry in his favorites.
In case there should be relicts despite the warnings, you can hide them by a click on the eye icon in the blue header line.
Before you can delete favorites you have to create them. You can do it in the personal area top right in the blue bar by clicking on the icon of the desired element type. The corresponding tree will open for selection. It is probably much faster and easier to go to the element in the tree on the left side. Open the context menu with a right click. In there you will find “Add to favorites” with the well-known star. After just one click you will see the message confirming that the selected element was added to the list of favorites.
Administration
The third tab will probably be used only rarely, as modern security concepts ask for more than just a username and a password, a user can configure by himself.
It is impossible for a user to grant himself administrator rights or to increase the lifetime of his credentials, so these fields are for information purposes only.

If this tab is visible it is of course useful if the user really changes his password from time to time. After a change the new password it is valid after logout starting with the next login.
Conclusion
We hope the new personal area eases your work a little bit – as soon as you got to know the new possibilties. Please let us know if you have other ideas or wishes. Maybe we know them already, maybe they are entirely new to us. We will see.